
Replace the battery of your Huawei P10
Is your battery getting weak? It's not hard to repair your Huawei P10! Each step has detailed photos to guide you through this screen replacement.
To reach the battery, you have to open the Huawei P10.
The Huawei P10 battery is not so hard to fix, since the back cover isn't glued on.
Run a data backup before the repair, use a clean work surface and take enough time.
Also check your spare part before installation. If you find any visible errors, please contact your vendor before starting!
If you have questions, use the live chat on our website or write a comment.
Required tools
-
Flat Picks
Flat Picks
You need a very flat tool such as a flat pick to pry out parts that are glued in place.
from €11.95 on Amazon -
iPlastix Opening Tool
iPlastix Opening Tool
Do you want to open your smartphone or lever out large parts like the battery? Then the iPlastix with its large blade will help you. The practical assistant is made of flexible, especially sturdy plastic and lies comfortably in the hand. Thanks to its design, you can even get into smaller gaps, for example to lift the screen or to prevent it from sticking together again.
on Amazon -
For storing screws
For storing screws
We recommend storing your screws so you don’t mix up the various screws and small parts.
from €10.99 on Amazon -
Plastic prying tool
Plastic prying tool
You need a flat plastic prying tool to disconnect the various plugs and connectors.
from €14.99 on Amazon -
Steel Laboratory Spatula
Steel Laboratory Spatula
You need a flat and sturdy prying tool to disconnect glued parts.
on Amazon -
Pentalobe PL1 screwdriver
Pentalobe PL1 screwdriver
You need the right screwdriver for removing pentalobe PL1 screws.
on Amazon -
Phillips PH00 screwdriver
Phillips PH00 screwdriver
You need the right screwdriver for removing PH00 screws.
from €10.84 on Amazon
Required replacement part
- Huawei P10 Battery


Getting started with the repair of your P10
If you get stuck or have questions, you can post a comment. We’d be happy to help.
-
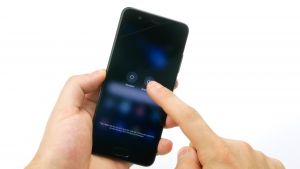
Switch off device
![P10 - Switch off device 01]()
![P10 - Switch off device 02]()
![P10 - Switch off device 03]()
-
-
Remove SIM tray
![P10 - Remove SIM tray 01]()
![P10 - Remove SIM tray 02]()
![P10 - Remove SIM tray 03]()
-
-
Unscrew the case
![P10 - Unscrew the case 01]()
![P10 - Unscrew the case 02]()
-
-
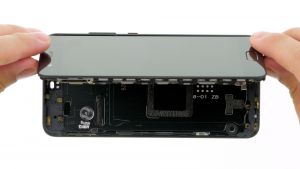
Remove rear case
![P10 - Remove rear case 01]()
![P10 - Remove rear case 02]()
![P10 - Remove rear case 03]()
![P10 - Remove rear case 04]()
![P10 - Remove rear case 05]()
![P10 - Remove rear case 06]()
![P10 - Remove rear case 07]()
![P10 - Remove rear case 08]()
-
-
Disconnect the battery
![P10 - Disconnect the battery 01]()
![P10 - Disconnect the battery 02]()
![P10 - Disconnect the battery 03]()
![P10 - Disconnect the battery 04]()
-
-
Disconnect the flex cable
![P10 - Disconnect the flex cable 01]()
![P10 - Disconnect the flex cable 02]()
![P10 - Disconnect the flex cable 03]()
![P10 - Disconnect the flex cable 04]()
![P10 - Disconnect the flex cable 05]()
![P10 - Disconnect the flex cable 06]()
-
-
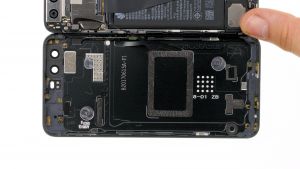
Remove the mainboard
![P10 - Remove the mainboard 01]()
![P10 - Remove the mainboard 02]()
![P10 - Remove the mainboard 03]()
![P10 - Remove the mainboard 04]()
![P10 - Remove the mainboard 05]()
![P10 - Remove the mainboard 06]()
![P10 - Remove the mainboard 07]()
![P10 - Remove the mainboard 08]()
![P10 - Remove the mainboard 09]()
-
-
Remove the battery
![P10 - Remove the battery 01]()
![P10 - Remove the battery 02]()
![P10 - Remove the battery 03]()
![P10 - Remove the battery 04]()
![P10 - Remove the battery 05]()
![P10 - Remove the battery 06]()
-
-
Prepare the battery
![P10 - Prepare the battery 01]()
![P10 - Prepare the battery 02]()
-
-
Insert the battey
![P10 - Insert the battey 01]()
![P10 - Insert the battey 02]()
![P10 - Insert the battey 03]()
-
-
Insert the mainboard
![P10 - Insert the mainboard 01]()
![P10 - Insert the mainboard 02]()
![P10 - Insert the mainboard 03]()
![P10 - Insert the mainboard 04]()
![P10 - Insert the mainboard 05]()
![P10 - Insert the mainboard 06]()
![P10 - Insert the mainboard 07]()
![P10 - Insert the mainboard 08]()
![P10 - Insert the mainboard 09]()
-
-
Connect flex cable
![P10 - Connect flex cable 01]()
![P10 - Connect flex cable 02]()
![P10 - Connect flex cable 03]()
![P10 - Connect flex cable 04]()
-
-
Connect the battery
![P10 - Connect the battery 01]()
![P10 - Connect the battery 02]()
![P10 - Connect the battery 03]()
![P10 - Connect the battery 04]()
![P10 - Connect the battery 05]()
-
-
Attach the rear case
![P10 - Attach the rear case 01]()
![P10 - Attach the rear case 02]()
![P10 - Attach the rear case 03]()
![P10 - Attach the rear case 04]()
![P10 - Attach the rear case 05]()
![P10 - Attach the rear case 06]()
-
-
Attach rear case screws
![P10 - Attach rear case screws 01]()
-
-
Insert the SIM tray
![P10 - Insert the SIM tray 01]()
![P10 - Insert the SIM tray 02]()
![P10 - Insert the SIM tray 03]()
-


The right tools for your repair


Similar guides
You might also be interested in these guides.

You might be interested in
