
The screen is broken or remains black.
In this repair guide, we show you how to replace your Sony Xperia Z2’s defective display unit on your own. You need this repair if the glass is cracked, the touchscreen no longer responds to touch, or the LCD remains black or flickers.
Required tools
-
Heat gun
Heat gun
You can use a heat gun to heat parts that are glued on so they’re easier to remove. In most cases, you can also use a hairdryer.
from €15.99 on Amazon -
Menda ESD Spudger
Menda ESD Spudger
You need a flat plastic prying tool to disconnect the various plugs and connectors.
from €26.38 on Amazon -
Steel Laboratory Spatula
Steel Laboratory Spatula
You need a flat and sturdy prying tool to disconnect glued parts.
on Amazon -
iDoc Tool Kit, 21 pieces
iDoc Tool Kit, 21 pieces
Do you need to repair your smartphone? This kit includes all the tools you need for professional-quality repairs, from the ESD spudger and suction cup, to screwdrivers and tweezers, as well as the iDoc magnetic pad that holds your screws and small parts in place while you work. Not sure what goes where? Don’t worry – our detailed repair guides tell you what tool to use for each step.
from €29.99 on Amazon -
Phillips PH00 screwdriver
Phillips PH00 screwdriver
You need the right screwdriver for removing PH00 screws.
from €10.84 on Amazon
Required replacement part
- Sony Xperia Z2 Display


Getting started with the repair of your Xperia Z2
If you get stuck or have questions, you can post a comment. We’d be happy to help.
-
Removing the SIM and microSD cards
![Xperia Z2 - Removing the SIM and microSD cards 01]()
![Xperia Z2 - Removing the SIM and microSD cards 02]()
![Xperia Z2 - Removing the SIM and microSD cards 03]()
![Xperia Z2 - Removing the SIM and microSD cards 04]()
-
-
Removing the back cover
![Xperia Z2 - Removing the back cover 01]()
![Xperia Z2 - Removing the back cover 02]()
-
-
Inserting the pick
![Xperia Z2 - Inserting the pick 01]()
![Xperia Z2 - Inserting the pick 02]()
![Xperia Z2 - Inserting the pick 03]()
-
-
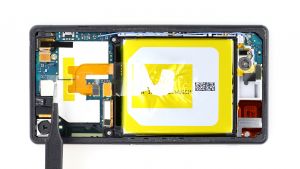
Removing the battery
![Xperia Z2 - Removing the battery 01]()
![Xperia Z2 - Removing the battery 02]()
![Xperia Z2 - Removing the battery 03]()
![Xperia Z2 - Removing the battery 04]()
![Xperia Z2 - Removing the battery 05]()
-
-
Disconnecting the logic board
![Xperia Z2 - Disconnecting the logic board 01]()
![Xperia Z2 - Disconnecting the logic board 02]()
-
-
Disconnecting all the connections to the logic board
![Xperia Z2 - Disconnecting all the connections to the logic board 01]()
![Xperia Z2 - Disconnecting all the connections to the logic board 02]()
![Xperia Z2 - Disconnecting all the connections to the logic board 03]()
![Xperia Z2 - Disconnecting all the connections to the logic board 04]()
![Xperia Z2 - Disconnecting all the connections to the logic board 05]()
-
-
Removing the logic board
![Xperia Z2 - Removing the logic board 01]()
![Xperia Z2 - Removing the logic board 02]()
-
-
Disconnecting all the connections to the sub-board
![Xperia Z2 - Disconnecting all the connections to the sub-board 01]()
![Xperia Z2 - Disconnecting all the connections to the sub-board 02]()
-
-
Removing the bracket on the speaker
![Xperia Z2 - Removing the bracket on the speaker 01]()
![Xperia Z2 - Removing the bracket on the speaker 02]()
-
-
Removing the sub-board
![Xperia Z2 - Removing the sub-board 01]()
![Xperia Z2 - Removing the sub-board 02]()
![Xperia Z2 - Removing the sub-board 03]()
![Xperia Z2 - Removing the sub-board 04]()
![Xperia Z2 - Removing the sub-board 05]()
![Xperia Z2 - Removing the sub-board 06]()
-
-
Removing the antenna cable
![Xperia Z2 - Removing the antenna cable 01]()
-
-
Removing the charger contact’s flexible flat cable
![Xperia Z2 - Removing the charger contact’s flexible flat cable 01]()
![Xperia Z2 - Removing the charger contact’s flexible flat cable 02]()
-
-
Removing the main flexible flat cable
![Xperia Z2 - Removing the main flexible flat cable 01]()
![Xperia Z2 - Removing the main flexible flat cable 02]()
![Xperia Z2 - Removing the main flexible flat cable 03]()
![Xperia Z2 - Removing the main flexible flat cable 04]()
![Xperia Z2 - Removing the main flexible flat cable 05]()
![Xperia Z2 - Removing the main flexible flat cable 06]()
![Xperia Z2 - Removing the main flexible flat cable 07]()
-
-
Transferring parts
![Xperia Z2 - Transferring parts 01]()
![Xperia Z2 - Transferring parts 02]()
-
-
Installing the main flexible flat cable
![Xperia Z2 - Installing the main flexible flat cable 01]()
![Xperia Z2 - Installing the main flexible flat cable 02]()
![Xperia Z2 - Installing the main flexible flat cable 03]()
![Xperia Z2 - Installing the main flexible flat cable 04]()
-
-
Installing the charger contact’s flexible flat cable
![Xperia Z2 - Installing the charger contact’s flexible flat cable 01]()
-
-
Connecting the antenna cable
![Xperia Z2 - Connecting the antenna cable 01]()
-
-
Installing the sub-board
![Xperia Z2 - Installing the sub-board 01]()
![Xperia Z2 - Installing the sub-board 02]()
![Xperia Z2 - Installing the sub-board 03]()
![Xperia Z2 - Installing the sub-board 04]()
![Xperia Z2 - Installing the sub-board 05]()
-
-
Installing the bracket on the speaker
![Xperia Z2 - Installing the bracket on the speaker 01]()
-
-
Making all the connections to the sub-board
![Xperia Z2 - Making all the connections to the sub-board 01]()
![Xperia Z2 - Making all the connections to the sub-board 02]()
-
-
Installing the logic board
![Xperia Z2 - Installing the logic board 01]()
-
-
Making all the connections to the logic board
![Xperia Z2 - Making all the connections to the logic board 01]()
![Xperia Z2 - Making all the connections to the logic board 02]()
![Xperia Z2 - Making all the connections to the logic board 03]()
![Xperia Z2 - Making all the connections to the logic board 04]()
![Xperia Z2 - Making all the connections to the logic board 05]()
-
-
Attaching the logic board
![Xperia Z2 - Attaching the logic board 01]()
![Xperia Z2 - Attaching the logic board 02]()
-
-
Installing the battery
![Xperia Z2 - Installing the battery 01]()
![Xperia Z2 - Installing the battery 02]()
![Xperia Z2 - Installing the battery 03]()
![Xperia Z2 - Installing the battery 04]()
-
-
Attaching the back cover
![Xperia Z2 - Attaching the back cover 01]()
-
-
Inserting the SIM and microSD cards
![Xperia Z2 - Inserting the SIM and microSD cards 01]()
![Xperia Z2 - Inserting the SIM and microSD cards 02]()
![Xperia Z2 - Inserting the SIM and microSD cards 03]()
![Xperia Z2 - Inserting the SIM and microSD cards 04]()
-


The right tools for your repair


Similar guides
You might also be interested in these guides.


You might be interested in
