
Your iPhone won’t charge, or the microphone and audio port aren’t working.
In this guide, we show you how to replace your iPhone SE’s defective Lightning connector on your own. You need this repair if your computer doesn’t recognize your iPhone, you can’t charge your iPhone, the headphone output has a loose connection, or remote control of the headset isn’t working. You also need to replace the Lightning connector if people can’t understand you on the phone because your microphone isn’t working.
Required tools
-
For storing screws
For storing screws
We recommend storing your screws so you don’t mix up the various screws and small parts.
from €10.99 on Amazon -
Tweezers
Tweezers
We recommend using tweezers to remove screws and various small parts from your device.
on Amazon -
Pick Set
Pick Set
You need a flat but stable tool such as a pick to pry out parts that are glued in place.
from €14.99 on Amazon -
Plastic prying tool
Plastic prying tool
You need a flat plastic prying tool to disconnect the various plugs and connectors.
from €14.99 on Amazon -
Steel Laboratory Spatula
Steel Laboratory Spatula
You need a flat and sturdy prying tool to disconnect glued parts.
on Amazon -
Pentalobe PL1 screwdriver
Pentalobe PL1 screwdriver
You need the right screwdriver for removing pentalobe PL1 screws.
on Amazon -
Phillips PH00 screwdriver
Phillips PH00 screwdriver
You need the right screwdriver for removing PH00 screws.
from €10.84 on Amazon
Required replacement part
- iPhone SE (1. Gen) Lightning Connector


Getting started with the repair of your iPhone SE
If you get stuck or have questions, you can post a comment. We’d be happy to help.
-
Turning off your iPhone SE
![iPhone SE - Turning off your iPhone SE 01]()
![iPhone SE - Turning off your iPhone SE 02]()
![iPhone SE - Turning off your iPhone SE 03]()
-
-
Removing the enclosure screws
![iPhone SE - Removing the enclosure screws 01]()
![iPhone SE - Removing the enclosure screws 02]()
![iPhone SE - Removing the enclosure screws 03]()
-
-
Lifting the display
![iPhone SE - Lifting the display 01]()
![iPhone SE - Lifting the display 02]()
![iPhone SE - Lifting the display 03]()
![iPhone SE - Lifting the display 04]()
![iPhone SE - Lifting the display 05]()
![iPhone SE - Lifting the display 06]()
-
-
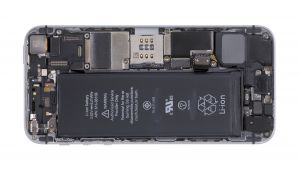
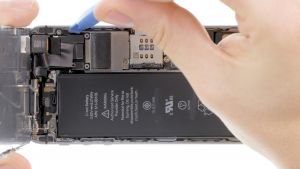
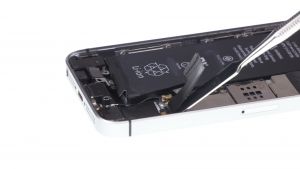
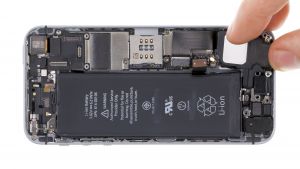
Disconnecting the battery contact
![iPhone SE - Disconnecting the battery contact 01]()
![iPhone SE - Disconnecting the battery contact 02]()
![iPhone SE - Disconnecting the battery contact 03]()
![iPhone SE - Disconnecting the battery contact 04]()
-
-
Disconnecting the display contacts
![iPhone SE - Disconnecting the display contacts 01]()
![iPhone SE - Disconnecting the display contacts 02]()
![iPhone SE - Disconnecting the display contacts 03]()
![iPhone SE - Disconnecting the display contacts 04]()
![iPhone SE - Disconnecting the display contacts 05]()
![iPhone SE - Disconnecting the display contacts 06]()
![iPhone SE - Disconnecting the display contacts 07]()
-
-
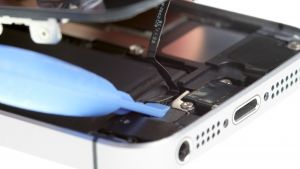
Disconnecting the antenna connector and Lightning connector
![iPhone SE - Disconnecting the antenna connector and Lightning connector 01]()
![iPhone SE - Disconnecting the antenna connector and Lightning connector 02]()
![iPhone SE - Disconnecting the antenna connector and Lightning connector 03]()
![iPhone SE - Disconnecting the antenna connector and Lightning connector 04]()
-
-
Removing the Lightning connector screws
![iPhone SE - Removing the Lightning connector screws 01]()
![iPhone SE - Removing the Lightning connector screws 02]()
-
-
Removing the speaker
![iPhone SE - Removing the speaker 01]()
![iPhone SE - Removing the speaker 02]()
![iPhone SE - Removing the speaker 03]()
![iPhone SE - Removing the speaker 04]()
-
-
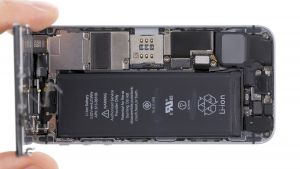
Removing the Lightning connector
![iPhone SE - Removing the Lightning connector 01]()
![iPhone SE - Removing the Lightning connector 02]()
![iPhone SE - Removing the Lightning connector 03]()
![iPhone SE - Removing the Lightning connector 04]()
![iPhone SE - Removing the Lightning connector 05]()
-
-
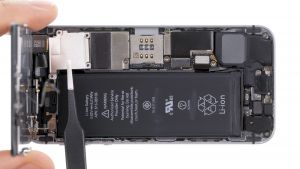
Installing the Lightning connector
![iPhone SE - Installing the Lightning connector 01]()
![iPhone SE - Installing the Lightning connector 02]()
![iPhone SE - Installing the Lightning connector 03]()
![iPhone SE - Installing the Lightning connector 04]()
-
-
Installing the speaker
![iPhone SE - Installing the speaker 01]()
![iPhone SE - Installing the speaker 02]()
![iPhone SE - Installing the speaker 03]()
![iPhone SE - Installing the speaker 04]()
-
-
Fastening the Lightning connector’s screws
![iPhone SE - Fastening the Lightning connector’s screws 01]()
![iPhone SE - Fastening the Lightning connector’s screws 02]()
-
-
Connecting the antenna connector and Lightning connector
![iPhone SE - Connecting the antenna connector and Lightning connector 01]()
![iPhone SE - Connecting the antenna connector and Lightning connector 02]()
![iPhone SE - Connecting the antenna connector and Lightning connector 03]()
![iPhone SE - Connecting the antenna connector and Lightning connector 04]()
-
-
Connecting the display
![iPhone SE - Connecting the display 01]()
![iPhone SE - Connecting the display 02]()
![iPhone SE - Connecting the display 03]()
![iPhone SE - Connecting the display 04]()
![iPhone SE - Connecting the display 05]()
-
-
Connecting the battery contact
![iPhone SE - Connecting the battery contact 01]()
![iPhone SE - Connecting the battery contact 02]()
![iPhone SE - Connecting the battery contact 03]()
![iPhone SE - Connecting the battery contact 04]()
-
-
Attaching the display
![iPhone SE - Attaching the display 01]()
![iPhone SE - Attaching the display 02]()
![iPhone SE - Attaching the display 03]()
![iPhone SE - Attaching the display 04]()
![iPhone SE - Attaching the display 05]()
![iPhone SE - Attaching the display 06]()
-
-
Fastening the enclosure screws
![iPhone SE - Fastening the enclosure screws 01]()
![iPhone SE - Fastening the enclosure screws 02]()
-
-
Setting the time
![iPhone SE - Setting the time 01]()
-


The right tools for your repair


Similar guides
You might also be interested in these guides.


You might be interested in
