
The Home button only sometimes works or doesn’t work at all.
In this guide, we show you how to replace a defective Home button cable. You need this repair if the Home button no longer works or only sometimes works.
Required tools
-
For storing screws
For storing screws
We recommend storing your screws so you don’t mix up the various screws and small parts.
from €10.99 on Amazon -
Menda ESD Spudger
Menda ESD Spudger
You need a flat plastic prying tool to disconnect the various plugs and connectors.
from €26.38 on Amazon -
Steel Laboratory Spatula
Steel Laboratory Spatula
You need a flat and sturdy prying tool to disconnect glued parts.
on Amazon -
Pentalobe PL1 screwdriver
Pentalobe PL1 screwdriver
You need the right screwdriver for removing pentalobe PL1 screws.
on Amazon -
Phillips PH00 screwdriver
Phillips PH00 screwdriver
You need the right screwdriver for removing PH00 screws.
from €10.84 on Amazon
Required replacement part
- iPhone 4 Home Button Cable


Getting started with the repair of your iPhone 4
If you get stuck or have questions, you can post a comment. We’d be happy to help.
-
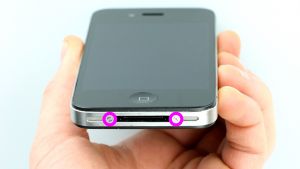
Removing the enclosure screws
![iPhone 4 - Removing the enclosure screws 01]()
-
-
Removing the back cover
![iPhone 4 - Removing the back cover 01]()
![iPhone 4 - Removing the back cover 02]()
-
-
Disconnecting the battery connector
![iPhone 4 - Disconnecting the battery connector 01]()
![iPhone 4 - Disconnecting the battery connector 02]()
-
-
Removing the battery
![iPhone 4 - Removing the battery 01]()
![iPhone 4 - Removing the battery 02]()
![iPhone 4 - Removing the battery 03]()
-
-
Plastic tab
![iPhone 4 - Plastic tab 01]()
![iPhone 4 - Plastic tab 02]()
-
-
Disconnecting the dock connector cable
![iPhone 4 - Disconnecting the dock connector cable 01]()
![iPhone 4 - Disconnecting the dock connector cable 02]()
![iPhone 4 - Disconnecting the dock connector cable 03]()
-
-
Removing the Wi-Fi cover
![iPhone 4 - Removing the Wi-Fi cover 01]()
![iPhone 4 - Removing the Wi-Fi cover 02]()
![iPhone 4 - Removing the Wi-Fi cover 03]()
-
-
Disconnecting the connectors
![iPhone 4 - Disconnecting the connectors 01]()
![iPhone 4 - Disconnecting the connectors 02]()
![iPhone 4 - Disconnecting the connectors 03]()
-
-
Removing the rear camera
![iPhone 4 - Removing the rear camera 01]()
-
-
Removing the water indicator
![iPhone 4 - Removing the water indicator 01]()
-
-
Removing the SIM card tray
![iPhone 4 - Removing the SIM card tray 01]()
-
-
Removing the logic board
![iPhone 4 - Removing the logic board 01]()
![iPhone 4 - Removing the logic board 02]()
![iPhone 4 - Removing the logic board 03]()
![iPhone 4 - Removing the logic board 04]()
-
-
Removing the speaker
![iPhone 4 - Removing the speaker 01]()
![iPhone 4 - Removing the speaker 02]()
-
-
Removing the vibration motor
![iPhone 4 - Removing the vibration motor 01]()
-
-
Loosening the screws on the sides
![iPhone 4 - Loosening the screws on the sides 01]()
![iPhone 4 - Loosening the screws on the sides 02]()
![iPhone 4 - Loosening the screws on the sides 03]()
-
-
Removing the four corner screws
![iPhone 4 - Removing the four corner screws 01]()
![iPhone 4 - Removing the four corner screws 02]()
![iPhone 4 - Removing the four corner screws 03]()
![iPhone 4 - Removing the four corner screws 04]()
-
-
Disconnecting the display
![iPhone 4 - Disconnecting the display 01]()
![iPhone 4 - Disconnecting the display 02]()
![iPhone 4 - Disconnecting the display 03]()
![iPhone 4 - Disconnecting the display 04]()
-
-
Taking off the display
![iPhone 4 - Taking off the display 01]()
-
-
Removing the Home button cable
![iPhone 4 - Removing the Home button cable 01]()
![iPhone 4 - Removing the Home button cable 02]()
![iPhone 4 - Removing the Home button cable 03]()
-
-
Preparing the Home button
![iPhone 4 - Preparing the Home button 01]()
![iPhone 4 - Preparing the Home button 02]()
-
-
Installing the Home button cable
![iPhone 4 - Installing the Home button cable 01]()
![iPhone 4 - Installing the Home button cable 02]()
![iPhone 4 - Installing the Home button cable 03]()
-
-
Attaching the new display
![iPhone 4 - Attaching the new display 01]()
![iPhone 4 - Attaching the new display 02]()
![iPhone 4 - Attaching the new display 03]()
![iPhone 4 - Attaching the new display 04]()
-
-
Putting in the corner screws
![iPhone 4 - Putting in the corner screws 01]()
![iPhone 4 - Putting in the corner screws 02]()
![iPhone 4 - Putting in the corner screws 03]()
![iPhone 4 - Putting in the corner screws 04]()
-
-
Tightening the screws on the sides
![iPhone 4 - Tightening the screws on the sides 01]()
![iPhone 4 - Tightening the screws on the sides 02]()
![iPhone 4 - Tightening the screws on the sides 03]()
-
-
Installing the vibration motor
![iPhone 4 - Installing the vibration motor 01]()
![iPhone 4 - Installing the vibration motor 02]()
-
-
Installing the speaker
![iPhone 4 - Installing the speaker 01]()
![iPhone 4 - Installing the speaker 02]()
-
-
Installing the logic board
![iPhone 4 - Installing the logic board 01]()
![iPhone 4 - Installing the logic board 02]()
![iPhone 4 - Installing the logic board 03]()
![iPhone 4 - Installing the logic board 04]()
-
-
Attaching the water indicator
![iPhone 4 - Attaching the water indicator 01]()
-
-
Connecting the connections
![iPhone 4 - Connecting the connections 01]()
-
-
Installing the Wi-Fi cover
![iPhone 4 - Installing the Wi-Fi cover 01]()
![iPhone 4 - Installing the Wi-Fi cover 02]()
-
-
Attaching the dock connector cable
![iPhone 4 - Attaching the dock connector cable 01]()
-
-
Aligning the plastic tab
![iPhone 4 - Aligning the plastic tab 01]()
-
-
Installing the battery
![iPhone 4 - Installing the battery 01]()
![iPhone 4 - Installing the battery 02]()
![iPhone 4 - Installing the battery 03]()
-
-
Attaching the back cover
![iPhone 4 - Attaching the back cover 01]()
-
-
Fastening the enclosure screws
![iPhone 4 - Fastening the enclosure screws 01]()
-
-
Setting the time
![iPhone 4 - Setting the time 01]()
-


The right tools for your repair


Similar guides
You might also be interested in these guides.


You might be interested in

