Put your iPhone Xr on a soft, clean surface to avoid scratching the back.
To lift the front panel, you need a suction cup, a hard plastic pick and a heat gun. If the screen is severely cracked, cover all of it with packing tape before you continue.
The screen is glued to the frame. Use a heat gun to heat the outer edges of the display to about 60°C (140°F).
Place the suction cup at the bottom of the display. While lifting the screen with the suction cup, insert the hard plastic pick between the frame and the display and press down the frame.
Do not insert your tool more than 5 mm into the gap, so you don't damage small parts inside the iPhone.
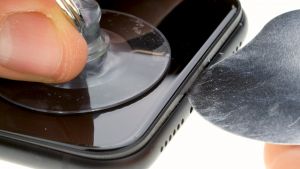
If you are using an iFlex, switch to a plastic pick as soon as possible to avoid scratching the frame.
Because the display’s glued on, you have to slide the pick all around the iPhone between the aluminum frame and the display frame. Don’t stick the pick in too far on the side where the Sleep/Wake button is because that could damage the display flex cables.
Now use the pick to push up the display so the tabs disengage from the steel frame. Then you can fold the display over to the side. Rest the display on a stable object to avoid straining the sensitive flex cables.
Heat the outer edge of the frame several times if necessary.
7
verwandte Anleitungen
Der Schritt wird dir in diesen Anleitungen angezeigt
Diese
Website benutzt Cookies, die für den technischen Betrieb der Website erforderlich sind und stets gesetzt
werden. Andere Cookies, die den Komfort bei Benutzung dieser Website erhöhen, der Direktwerbung dienen
oder die Interaktion mit anderen Websites und sozialen Netzwerken vereinfachen sollen, werden nur mit
Ihrer Zustimmung gesetzt. Datenschutzerklärung
Diese Website benutzt Cookies, die für den technischen Betrieb der
Website erforderlich sind und stets gesetzt werden. Andere Cookies, die den Komfort bei Benutzung dieser
Website erhöhen, der Direktwerbung dienen oder die Interaktion mit anderen Websites und sozialen
Netzwerken vereinfachen sollen, werden nur mit Ihrer Zustimmung gesetzt. Datenschutzerklärung
Technisch erforderlich
Diese Cookies sind für die Grundfunktionen
des Shops notwendig.
Alle Cookies ablehnen
Alle Cookies annehmen
Ausgewählter Shop
CSRF-Token
Cookie-Einstellungen
Google Tag Manager
Individuelle Preise
Kundenspezifisches Caching
PayPal-Zahlungen
Session
Währungswechsel
Komfortfunktionen
Diese Cookies werden genutzt um das
Einkaufserlebnis noch ansprechender zu gestalten, beispielsweise für die Wiedererkennung
des Besuchers.
Merkzettel
Statistik &
Tracking
Endgeräteerkennung
Facebook Pixel
Google Remarketing
Hotjar
Partnerprogramm
Profi-Insights & Tipps für deine erfolgreiche Handy-Reparatur
We use cookies to store information so we can offer you a better Web experience. By browsing our website, you accept the use of cookies. More information